


Basic Command
I've recently worked on a project where I had to create a WPF plugin for AutoCAD. And surprisingly, I was not able to find a single resource which talks about all the fundamentals of a WPF plugin and adding a Ribbon tab. So here is what I was able to figure out from multiple resources.
Before getting into creating a WPF plugin, you need to be aware of creating a basic AutoCAD plugin
Getting started with AutoCAD API
Below links are a good place to start:
1. My First AutoCAD Plug-in Overview
2. Exercises: Create Your First Project
3. User interfaces with AutoCAD .NET
4. AutoCAD Training Material
Now that you know how to create a basic AutoCAD Plugin, lets start creating a WPF Plugin.
Setting up a new Visual Studio Project
Open a new instance of Visual Studio and create a "New Project". In the options to choose a "project template", choose "Class Library (.NET Framework)". (Tip: search for "dll" to shorten the list of templates). Then choose a desired name (eg: ProjectName) & folder for the project and click create. A new instance of a project with a blank "Class1.cs" will be created.
Adding AutoCAD .dll references
Now you need to add AutoCAD's dll references into you Visual Studio project so that you can make use of the AutoCAD API. To do this, right click on "references" in your Solution Explrore and choose add references. Then, choose "browse" at the bottom to browser for the below dll files based on you AutoCAD version
- AcMdg:
C:\Program Files\Autodesk\AutoCAD 20xx\acmgd.dll - AcDbMgd:
C:\Program Files\Autodesk\AutoCAD 20xx\acdbmgd.dll - AcCoreMgd:
C:\Program Files\Autodesk\AutoCAD 20xx\accoremgd.dll
After adding these references, ctrl-click over each of the selected references, then right-click and choose Properties. In the Properties window, click the Copy Local field and then select
Falsefrom the drop-down list.
Creating a new custom command
Check out the following links to know how AutoCAD looks for a custom API command (CommandClass & ExtensionApplication):
Before adding a WPF window, lets create a new custom command which will later be used to call the WPF window. Below code is a referenced from the following Autodesk article to create a basic command using AutoCAD API which will create a new multiline text (MText) object in Model space.
Replace all the contents from your Class1.cs file with below code.
using Autodesk.AutoCAD.Runtime;
using Autodesk.AutoCAD.ApplicationServices;
using Autodesk.AutoCAD.DatabaseServices;
[assembly: CommandClass(typeof(AutoCAD_WPF_101.Class1))]
namespace AutoCAD_WPF_101
{
    public class Class1
    {
        [CommandMethod("AdskGreeting")]
        public static void AdskGreeting()
        {
            // Get the current document and database, and start a transaction
            Document acDoc = Application.DocumentManager.MdiActiveDocument;
            Database acCurDb = acDoc.Database;
            // Starts a new transaction with the Transaction Manager
            using (Transaction acTrans = acCurDb.TransactionManager.StartTransaction())
            {
                // Open the Block table record for read
                BlockTable acBlkTbl;
                acBlkTbl = acTrans.GetObject(acCurDb.BlockTableId,
                                             OpenMode.ForRead) as BlockTable;
                // Open the Block table record Model space for write
                BlockTableRecord acBlkTblRec;
                acBlkTblRec = acTrans.GetObject(acBlkTbl[BlockTableRecord.ModelSpace],
                                                OpenMode.ForWrite) as BlockTableRecord;
                /* Creates a new MText object and assigns it a location,
                text value and text style */
                MText objText = new MText();
                // Set the default properties for the MText object
                objText.SetDatabaseDefaults();
                // Specify the insertion point of the MText object
                objText.Location = new Autodesk.AutoCAD.Geometry.Point3d(2, 2, 0);
                // Set the text string for the MText object
                objText.Contents = "Greetings, Welcome to the AutoCAD .NET Developer's Guide";
                // Set the text style for the MText object
                objText.TextStyleId = acCurDb.Textstyle;
                // Appends the new MText object to model space
                acBlkTblRec.AppendEntity(objText);
                // Appends to new MText object to the active transaction
                acTrans.AddNewlyCreatedDBObject(objText, true);
                // Saves the changes to the database and closes the transaction
                acTrans.Commit();
            }
        }
    }
}
Build & Test the application
At this point, lets build the plugin and test it if the above command is working as expected. To do this, click on "Build solution" from the "Build" menu in the ribbon. Confirm that the build is succeeded from the output window - below is what you should see:
========== Build: 1 succeeded, 0 failed, 0 up-to-date, 0 skipped ==========
This will create a new file called ProjectName.dll in ProjectFolder\bin\Debug\ folder of your project. Now open a blank drawing in AutoCAD and use the NETLOAD. Then browse to the ProjectFolder\bin\Debug\ folder and choose ProjectName.dll to load the plugin. Choose "load once" if you're prompted.
This will load the plugin and now you should be able to use the command AdskGreeting that we defined in the above Class1.cs. Using the AdskGreeting command will add a text in your Model space close to the origin.
Note: It's a good practice to keep testing your plugin as you continue to work on it.
WPF
Now that we have a working command, lets add a WPF window which we can use to run this command on a button click.
Creating a WPF Window
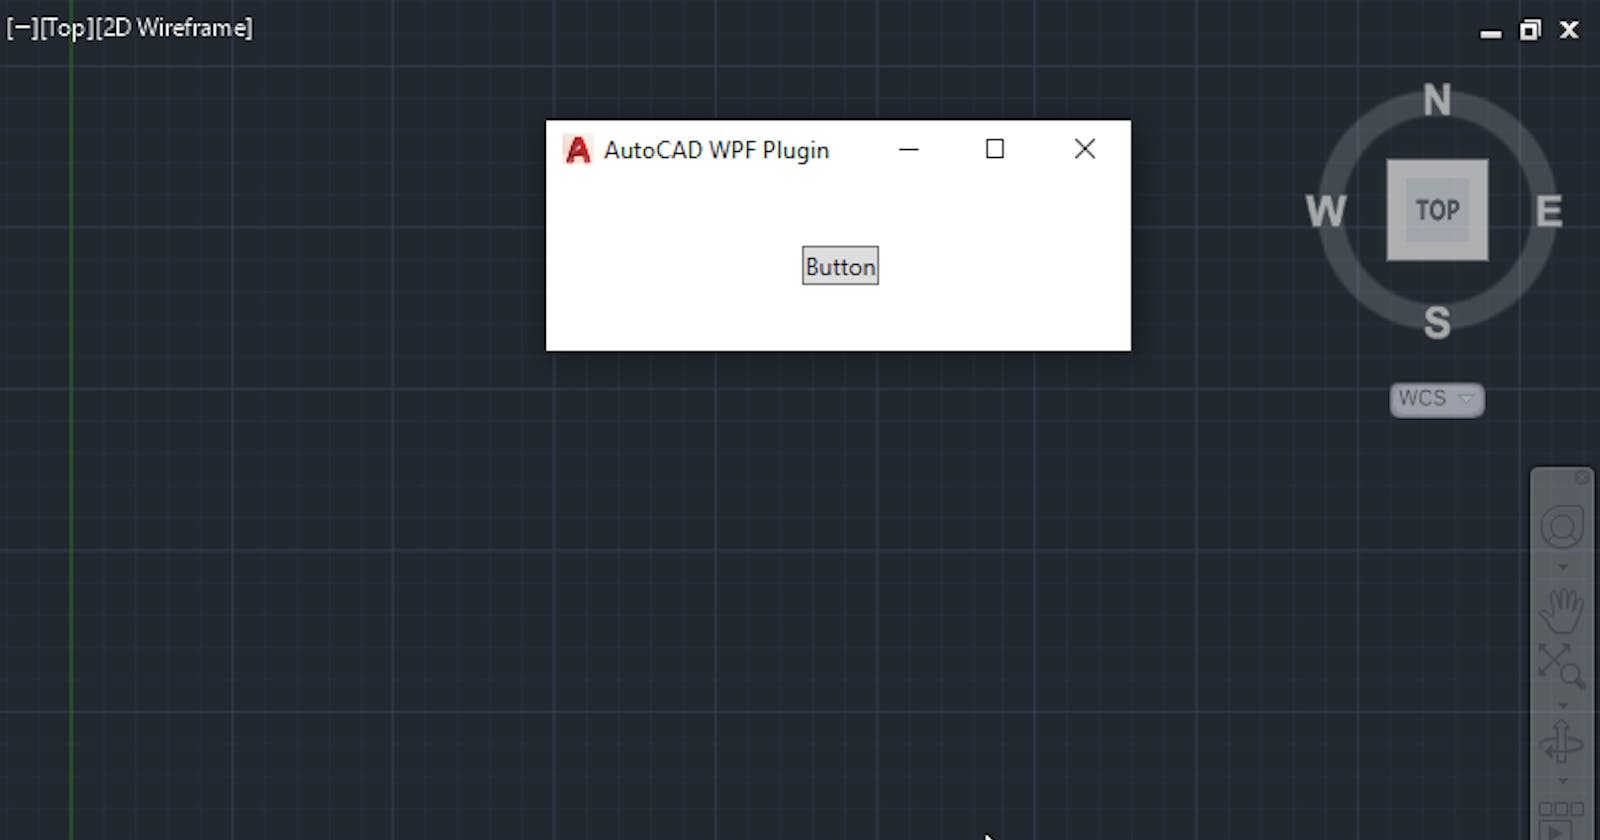
Right click on your project in Solution Explore and click "Add > New Item" and choose UserControl (WPF) from the window. Then rename the UserControl.xaml file to MainWindow.xaml and then replace <UserControl with <Window in the 1st line of XAML & MainWindow : UserControl with MainWindow : Window in your MainWindow.xaml.cs file. Now we have a blank WPF window ready.
Lets add a button into the window which we'll use later to trigger the AdskGreeting command.
<Button x:Name="button" Content="Button" HorizontalAlignment="Center" VerticalAlignment="Center"/>
Initiating the WPF window from the custom command
Now lets create a command which will open our WPF Window. We can add this command below the existing AdskGreeting command;
[CommandMethod("OpenWPFWindow")]
public void CmdOpenWPFWindow()
{
    var wpfWindow = new MainWindow();
    var wpfResult = AcAp.ShowModalWindow(expWindow);
}
Now lets call the AdskGreeting command when the button I clicked. Below is the final code
<Window x:Class="AutoCAD_WPF_101.MainWindow"
             xmlns="http://schemas.microsoft.com/winfx/2006/xaml/presentation"
             xmlns:x="http://schemas.microsoft.com/winfx/2006/xaml"
             xmlns:mc="http://schemas.openxmlformats.org/markup-compatibility/2006"
             xmlns:d="http://schemas.microsoft.com/expression/blend/2008"
             xmlns:local="clr-namespace:AutoCAD_WPF_101"
             mc:Ignorable="d"
             d:DesignHeight="150" d:DesignWidth="300">
    <Grid>
        <Button x:Name="button" Content="Button" HorizontalAlignment="Center" VerticalAlignment="Center" Click="button_Click"/>
    </Grid>
</Window>
using System.Windows;

namespace AutoCAD_WPF_101
{
    /// <summary>
    /// Interaction logic for MainWindow.xaml
    /// </summary>
    public partial class MainWindow : Window
    {
        public MainWindow()
        {
            InitializeComponent();
        }

        private void button_Click(object sender, RoutedEventArgs e)
        {
            Class1.AdskGreeting();
            this.Close(); // close the window to display the text added by the plugin in Model space
        }
    }
}
We now have a working code. Load the .dll using NETLOAD and use the command OpenWPFWindow which will open a WPF window in AutoCAD.
In the next article, we will talk about how to add a Ribbon in AutoCAD UI and how to distribute the plugin to other people.
Sample Code:
I've published an example repository on GitHub which you can clone and test this functionality